By the time I hit college, I was of the belief that I was a true Aurora "aficionado"; that I had discovered all the kits they'd ever produced in the superhero and monster lines. Hah. That turned out to be quite untrue, and the Penguin was the kit that started to bring that realization to light.

When I first heard of it, probably sometime in the 80's, I thought it was just a rumor, or wishful thinking on the part of those who had wanted Aurora to keep on producing kits of the characters we craved. Not so; proof finally came in the form of a "for sale" listing in a catalog from a seller of vintage kits (none of which I could ever afford). He was a reputable dealer, so if it was listed, it existed. After I saw that, I started to hunt down any information on the Penguin kit I could get, which (before the days of the internet) was not easy to do. In fact, I don't think I ever SAW the actual kit until I saw a pic of it in a 1994 issue of Kit Builders and Glue Sniffers magazine:

Now, I had built this kit up in my mind as something truly awesome; I don't really know why. Maybe because it was Batman themed, and it was an AURORA, that I thought it would be just mind blowing in its design. The reality, for me, was a bit mixed. My first reaction was that the kit was just.... odd. And the more I thought about it, the more odd it became. And then the questions started popping up in my head.
First and foremost: why the Penguin? Why not the Joker, or even the Riddler, given his popularity on the Batman tv show, which was presumably why this kit was even produced? For that matter, why does the kit itself look pretty much as the Penguin is portrayed by Burgess Meredith, while the box art is squarely derived from the character's appearance in the comics of the time? (thank you Carmine Infantio, once again, for re-vitalizing Batman comics in the 60's)


I mean it does make sense to have it look like the Penguin from tv, but why not do box art that shows as much, also? In my mind, since they'd already produced "comic" versions of Batman and Superman, they could have easily gone that same route with the Penguin, and I don't think it would have sold any less than the version they did release. I actually would have PREFERRED a more comics based version of the character.
When it comes to the pose of the model, it really just feels quirky. The detailing is great: the likeness to Meredith as the character is solid, the specific features of the costume from the tv show are all there, and the fine detailing on the base, particularly the cardboard box on which the figure is standing, is superb. But the whole thing still seems quirky and off balance to me. Maybe it works for the character; though I can't credit the designers with thinking that deeply about it, to be honest.
Well, in spite of all these questions and my initial reaction to the kit, I still wanted one, even though I was convinced I'd never track one down that I could conceivably own. Not only was it expensive, but it was rare for one to even show up in a listing of vintage kits for sale. I decided I would have to content myself with the pics I saw online. Until this past Wonderfest....
On my fourth round through the dealer room, stopping at a vendor I've seen every year I've been, it was there, on a high shelf, tucked away in a corner, almost out of sight. For only the second time in my life did I have the experience of seeing something clearly, yet not registering what it was immediately due to my own acceptance of its rarity. I think it took a minute, at least for me to realize what it was: a nearly COMPLETE, lightly painted Penguin model kit!!

It was smaller in scale than I expected, and I was in awe that the thinnest and most fragile pieces on it were unbroken. How they survived is surely a tale unto itself that I wish I knew. I was certain it was out of my price range, but I thought, "at least I can hold one in my hands", and so I asked the vendor to take it down from the shelf so I could get a better look at it.
It really WAS in great shape. A bit of dust, some sloppily applied paint on the face and the white parts of the outfit, and the existing decals were faded; but there were no blobs of glue, and no major breakage beyond a missing umbrella handle, and a missing clipboard. Just for the hell of it, I asked how much. When the answer came back, far lower than I expected, it was an instant sale. And just like that, I had what had been a long standing mystery to me as a part of my collection.

Which brings us to the next portion of this blog entry, and the first one that will have running updates as the restoration of the kit progresses.
The first step would be to break the kit down into sub-assemblies for ease of stripping what paint was there, and for easier repainting and assembly. Much like the Aurora Batman I'd restored some years earlier, my primary concerns were with how brittle the plastic might be, and how much glue I'd need to fight with to separate the parts. Luckily for me, whoever built it had followed the directive in so many instruction sheets and used their Testors glue "sparingly", so that I found it fairly easy to separate the kit from the base, and then break down those components even further. All were scrubbed in warm soapy water and allowed to dry before dunking them in my trusty vat of SuperClean degreaser.

Now, some of you may be very familiar with this stuff. It's like magic, how quickly and easily it strips off decades old enamel paint, while leaving the plastic untouched. I've used it before and it's always worked like a charm. And it DID work on the Penguin. For the flesh colored paint. The WHITE paint.... well, I don't know what they used, but to call it "stubborn" is the understatement of the century. That stuff would...not...dissolve. I left if for 4 days just soaking: nothing. Then I decided to get more pro-active on it, and started scrubbing with a tooth brush. It took HOURS, and some of it STILL wouldn't give up the ghost. Fortunately, a sufficient amount of the stuff did get removed to allow for a new and improved paint job.

As a next step, I thought I'd tackle the re-building of the umbrella handle that was broken off. I studied all the best pics I could find to get a read on the comparative length of that handle relative to other parts of the kit. It was not exact, and I had to cut off a bit more of it after I had thought it done, but I think it looks very good. It's nothing more than some small styrene rod which I heated and bent over an x-acto knife blade handle until I got the right curvature.

I then trimmed both ends to replicate the shape and length of the original piece. A little Aves apoxie sculpt on the curved end to sculpt the rounded shape of the handle's tip, and all that was left was figuring a way to anchor the new piece securely to the old parts of the kit.

I decided to drill out the straight end of the handle and the end of the umbrella the Penguin's holding, then use a straight pin attached to the handle so I could just insert it and glue in place. Took a bit of wrangling, since the pieces are so small, but I got the result I was looking for.

While I was doing this, I was waiting to receive the excellent replacement decal set from JTGraphics, offered through the CultTVMan website. Can't say enough good things about both; the decals are excellent, and CultTVMan's hobbyshop online has always been a great place to find exactly what I need for a project.
At this point, I'm reconstructing the clipboard. Due to the very kindly assistance of one of the members of the Parts Pit on facebook, I have a very large photo (with a ruler for scale) of the missing clipboard, and am using that to build a facsimile. I'm working on the board and it's "papers", first.

The shape of the individual pages of "paper" on the board may not be an exact match, but it will match the shape of the decal.

After that, I need to build the clip. Hoping to get to that soon!
Update 12/18:
Well, it's been some months since I've been able to work on the kit, but I've finally gotten back to it and can show the rest of the restoration process and the completed kit!
As planned, the next step in building the clipboard was the clip itself, and the additional piece of "paper" for the board. Here's the piece as it was originally finished.
 I was initially satisfied with this build, however, after some weeks went by and I was test fitting the decal, I realized I had made an error in the measurement of the top page of paper. I didn't allow for the portion that was under the clip of the clipboard. This added length is necessary to allow the decal to fit properly on the piece. As a result, I had to remove the clip and first "paper" on the piece, cut a new one the proper length, and then re-attach. I used a thinner grade of sheet plastic for the "paper", and it looks better than the first attempt.
 This piece was primed for painting, coated with a basic flat white, and put aside. I then turned to more sanding and finishing on the figure itself, and ran into one of the obstacles I had feared I might face: the age and brittle nature of the polystyrene. While trying to straighten and clean up the mold lines on the umbrella shaft the Penguin is holding over his head, the old plastic finally gave way and broke.
 I had thought I might just drill the plastic out on either end and re-attach using metal pins, but that might just leave me dealing with too fragile plastic still, having to worry about how well the joins would hold and how susceptible the old plastic is to warping under warm weather conditions. I decided to swap out the old plastic piece entirely, and substitute a piece of copper tubing of the same diameter, anchoring it to the figure with a metal rod. A second rod in the umbrella would attach it to the tube, as well.
 I used a pin vise with one of the smallest bits to create sockets for the metal pins on the figure and umbrella.


 Once the pins had been inserted and glued in place with epoxy, the tube was placed onto the pin in the umbrella side, any gaps were suitably filled in, and the piece was primed and put aside.
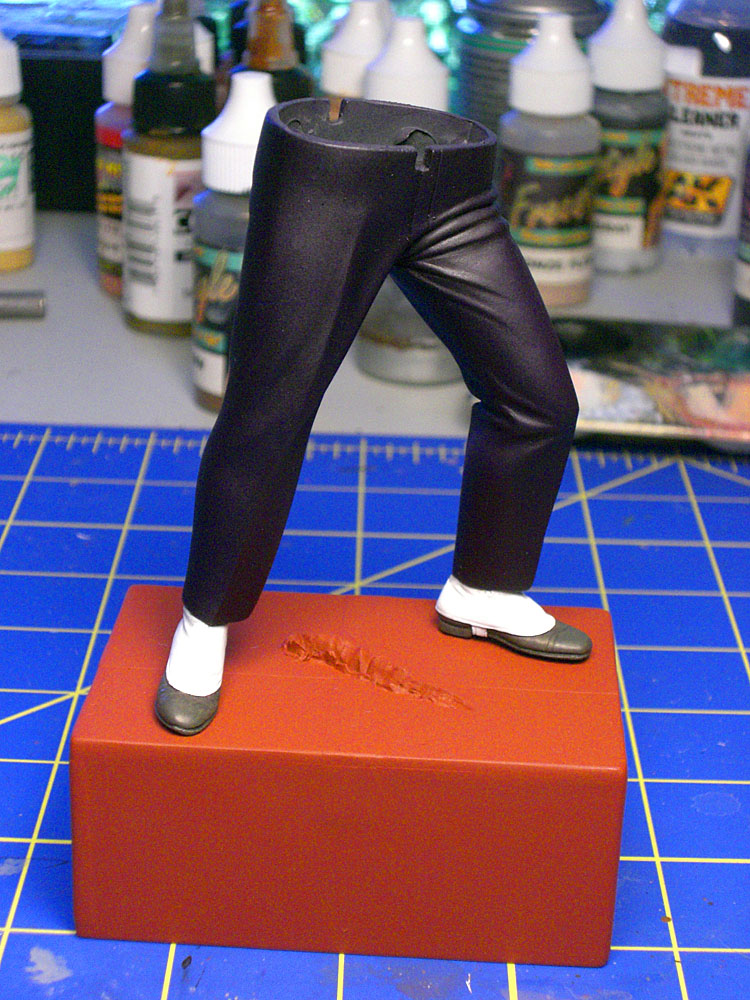
 Sanding and seam finishing continued on the rest of the figure as well as the base, with the bulk of time spent on the seams of the torso and the box on which the figure is standing. My technique is fairly standard, wet sanding with coarse to fine sanding film in stages, then filling any gaps with Squadron Green putty, and sanding again. Nothing really ground breaking there, so I'll skip the details. I'll only mention that throughout the process, the age and brittleness of the plastic was always a factor, so I took a little more time to work with it than usual.
Once all the seams and gaps were satisfactorily seen to, the entire figure was primed using duplicolor automotive primer in gray for those parts of the model that would be painted in cooler color tones, and red for those parts that would have warmer colors applied. I find using the red color as a base for all skin tones gives a much better result.

 As you can see from the second pic, the kit is already looking much better than when I first acquired it, even in its primer color state.
Since the kit is fairly small scale, yet has a lot of nice sculpted detail on the face, I wanted to paint it and use a light wash to bring those details out, rather than use an airbrush for the subtle shading I employ on large scale figure kits. A basic skin tone was applied, then a sepia wash was run over that.
 Some of the original skin tone was then lightly dry brushed over the piece to bring out further detail, then chalk pastels were applied with a soft brush to add further shading and pink tones to areas of the face. A darker chalk pastel was applied in the mouth, and the teeth were carefully picked out with a bone white color. The monocle, was painted with a coat of thin white, then a coat of silver pearl, then a coat of thin white again, allowing some of the silver pearl to show through. A coat of clear gloss was added as a finishing layer to create an illusion of glass catching the light. The one visible eye was done up in a neutral gray for the eyeball, and a dark/medium brown for the iris. the pupil was dotted in with black and black was run around the top of the eye to complete the look.


 One feature of these old kits that bothers me is the original sculptor's
tendency to sculpt into the eyeball and create an indentation for the
iris rather than leaving the eyeball as a smooth round object. I always
found the divot in the surface of the eye to detract from the final
look of the kit, particularly when trying to achieve a realistic
effect. I decided to use a technique that doll makers employ when
crafting eyes, and paint the iris and pupil in the indentation, which
would then be filled with a tiny drop of clear epoxy, in effect creating
the cornea on a real eye. It's a very subtle effect on such a small scale, but it's the kind of thing that will bug me enough so that if I don't do it, I'll never be happy with the finished kit. Here's the finished result, along with black painted hair on the head,and painted eyebrows, also in black.
One feature of these old kits that bothers me is the original sculptor's
tendency to sculpt into the eyeball and create an indentation for the
iris rather than leaving the eyeball as a smooth round object. I always
found the divot in the surface of the eye to detract from the final
look of the kit, particularly when trying to achieve a realistic
effect. I decided to use a technique that doll makers employ when
crafting eyes, and paint the iris and pupil in the indentation, which
would then be filled with a tiny drop of clear epoxy, in effect creating
the cornea on a real eye. It's a very subtle effect on such a small scale, but it's the kind of thing that will bug me enough so that if I don't do it, I'll never be happy with the finished kit. Here's the finished result, along with black painted hair on the head,and painted eyebrows, also in black.

The final touch is to coat the entire eye with gloss lacquer.
It was now time to turn to painting the other elements of the kit, and I decided to take care of the backwards folded umbrella first. The box art showed a greenish umbrella, and I liked that color choice, so I went with it for my version of the kit. After applying the basic green tone, shading was done with chalk pastels in the large folds, and a black green wash in the finer lines. The spines of the umbrella were picked out with silver, and the tag was painted in an off white with a brass eyelet and brown cord. The "SOLD" decal was applied, and the entire piece finished in matte lacquer.
 This was once again put aside, and work moved on to the legs. In considering the color of the Penguin's outfit, I was faced with whether or not to paint the character like the TV show version (as the sculpt is) or to go with a color scheme more like that of the comic books. Considering the fact that the box art depicts the comic version (as does Aurora's Batman and Robin kits), I felt I wanted a comic book version of the Penguin. Additionally, a new TV version of the Penguin has recently been released in kit form, which gave me further reason to go the comic book route. For me, then, that meant a purple color to the top had, bow tie and trousers, much like in the pic below:
 It also meant figuring out some way of including the yellow gold waistcoat the character wears. More on that later. I had though about doing the pin stripes for the trousers, but decided against it for scale considerations. I chose a dark purple that has some level of transparency, so the dark gray primer was a perfect base tone for my purposes. It was airbrushed over the trousers, then shaded with chalk pastels to bring out the details. The spats were done in white, and the shoes in brown as they are often colored in the comics.
 I was fortunate in that the paint I used to do the dry brushing had a natural semi-gloss appearance which replicated the appearance of leather very well. On to the torso and the question of the golden yellow waistcoat. I decided to do a gradient of the color from the bottom of the piece up, as though it were some high fashion garment with unusual coloring rather than trying to delineate an actual waistcoat either with paint alone or paint and sculpting. To me, it fit with the gaudy, flashy and expensive tastes of the character. One small obstacle was the bow tie. Since I needed the gray primer present to get the same tone as the other purple areas of the kit, that meant painting it first and then masking it off when the white tones and then the yellow were applied. It was a slow process, but the result was worth it.
 The buttons on the waistcoat were painted brass, then the entire center section was masked and the suit jacket was painted black.
 The gloves and cuffs were painted white also, and the small band of skin on the raised hand was painted in the same skin tones as the head.
Speaking of the head, it was masked off and the top hat was then painted the same purple tone. The cigarette holder and cigarette being painted earlier in black and off white.


 It was then time to work on the base. A basic medium gray was used for the floor, and a light tan for the cardboard box.

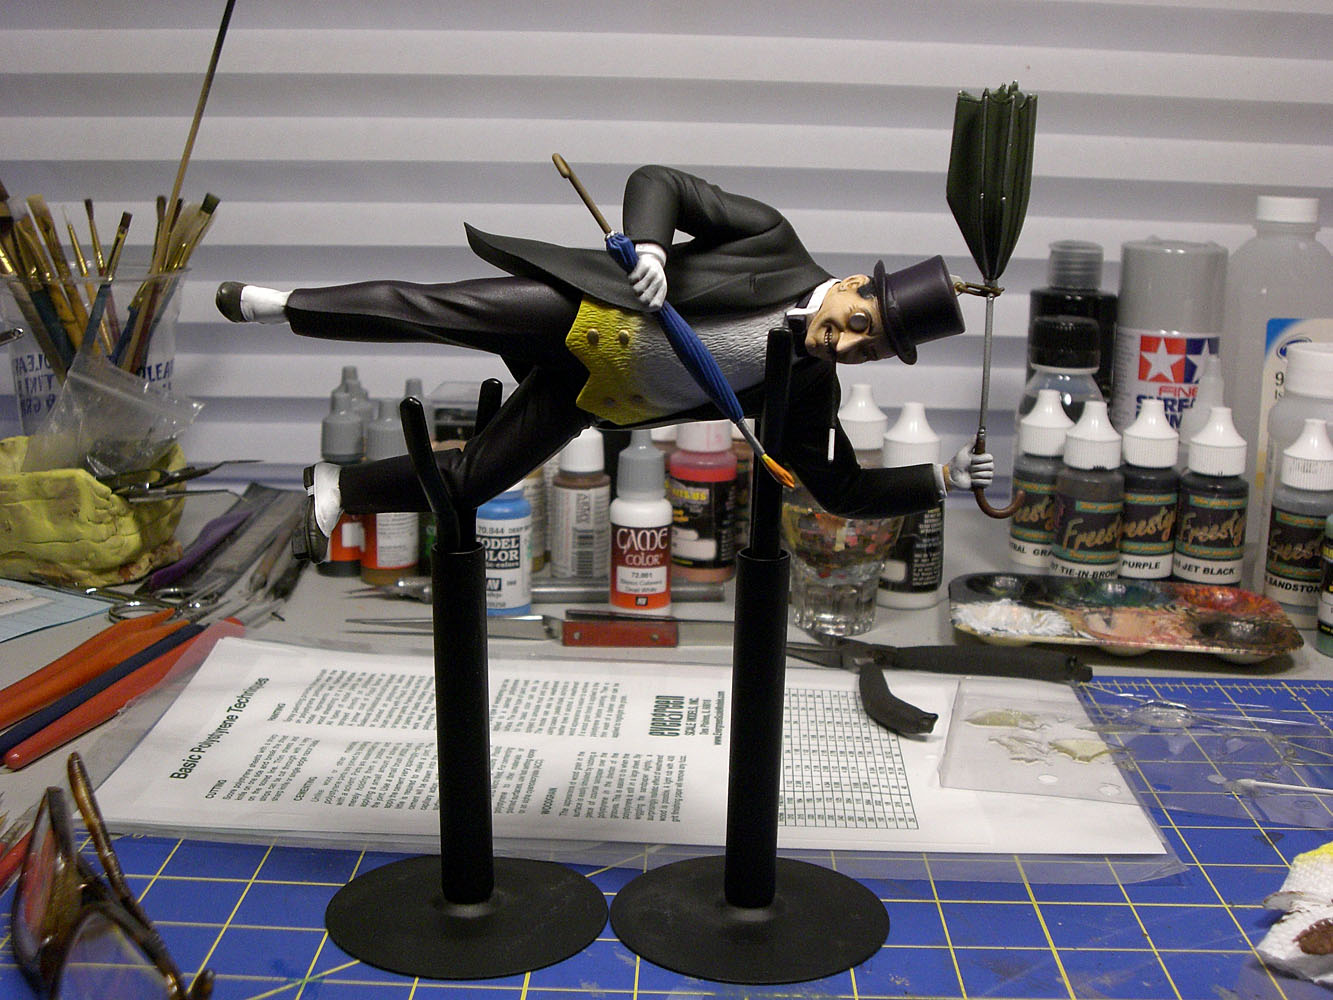
 While these were drying and I was deciding on how to finish the detailing on each, I set about taking care of the assembly of the figure itself. Epoxy was used on all the major joins, as well as the umbrella, to insure a stronger more durable bond.
 As you may note in the pic, the second umbrella has been painted. I had considered a red tone as on the box art, but went with a blue more in keeping with the overall color palette of the kit. Umbrella handles were painted in two different brown tones for variety, and the "flame" on the end of the blue umbrella was done in yellow and orange tones. Getting the umbrella shaft properly aligned and positioning it so it could dry properly proved a bit of a challenge, but a couple of figure stands were just the right solution for keeping the figure in the right orientation.
 This was allowed to dry for a couple of days to make sure the umbrella would not sag once the figure was standing upright.
The floor was finished in standard painting techniques, utilizing a dark wash and lighter gray for highlights and weathering. The stacks of money were painted in a light green base color, washed with a black green and highlighted with a sand color that had just a touch of light green added. Each stack had its own decal applied.
 The cardboard box had some very nice detailing that is visible in some of the close up pics you'll see here. The surface was finished with some lighter tones of the base color, a raw umber was used for the packing tape and off white with a sepia wash for the fine detailing. The entire box was coated with gloss lacquer so the great decals could be applied. These really "make" the kit!
 You'll also note the Batarang, which was finished in black with dark blue highlights, and the paper chart which was done in white and has another of the kits decals applied.
Restoring this kit was quite a tricky task at times, but I can't tell you how satisfied I am with the fact that I was able to "save" a 51 year old model kit, and bring it up to its best potential. And not just any old kit, but one as rare and much desired as the Aurora's Penguin. It's a fantastic piece of pop culture, and a truly unique entry in Aurora's lineup of amazing figure models!


And here's one last look at the kit as I originally found it, and how it looks now.

I hope you've enjoyed following along on this restoration project, and keep an eye out for the next entry!

When I first heard of it, probably sometime in the 80's, I thought it was just a rumor, or wishful thinking on the part of those who had wanted Aurora to keep on producing kits of the characters we craved. Not so; proof finally came in the form of a "for sale" listing in a catalog from a seller of vintage kits (none of which I could ever afford). He was a reputable dealer, so if it was listed, it existed. After I saw that, I started to hunt down any information on the Penguin kit I could get, which (before the days of the internet) was not easy to do. In fact, I don't think I ever SAW the actual kit until I saw a pic of it in a 1994 issue of Kit Builders and Glue Sniffers magazine:

Now, I had built this kit up in my mind as something truly awesome; I don't really know why. Maybe because it was Batman themed, and it was an AURORA, that I thought it would be just mind blowing in its design. The reality, for me, was a bit mixed. My first reaction was that the kit was just.... odd. And the more I thought about it, the more odd it became. And then the questions started popping up in my head.
First and foremost: why the Penguin? Why not the Joker, or even the Riddler, given his popularity on the Batman tv show, which was presumably why this kit was even produced? For that matter, why does the kit itself look pretty much as the Penguin is portrayed by Burgess Meredith, while the box art is squarely derived from the character's appearance in the comics of the time? (thank you Carmine Infantio, once again, for re-vitalizing Batman comics in the 60's)


I mean it does make sense to have it look like the Penguin from tv, but why not do box art that shows as much, also? In my mind, since they'd already produced "comic" versions of Batman and Superman, they could have easily gone that same route with the Penguin, and I don't think it would have sold any less than the version they did release. I actually would have PREFERRED a more comics based version of the character.
When it comes to the pose of the model, it really just feels quirky. The detailing is great: the likeness to Meredith as the character is solid, the specific features of the costume from the tv show are all there, and the fine detailing on the base, particularly the cardboard box on which the figure is standing, is superb. But the whole thing still seems quirky and off balance to me. Maybe it works for the character; though I can't credit the designers with thinking that deeply about it, to be honest.
Well, in spite of all these questions and my initial reaction to the kit, I still wanted one, even though I was convinced I'd never track one down that I could conceivably own. Not only was it expensive, but it was rare for one to even show up in a listing of vintage kits for sale. I decided I would have to content myself with the pics I saw online. Until this past Wonderfest....
On my fourth round through the dealer room, stopping at a vendor I've seen every year I've been, it was there, on a high shelf, tucked away in a corner, almost out of sight. For only the second time in my life did I have the experience of seeing something clearly, yet not registering what it was immediately due to my own acceptance of its rarity. I think it took a minute, at least for me to realize what it was: a nearly COMPLETE, lightly painted Penguin model kit!!

It was smaller in scale than I expected, and I was in awe that the thinnest and most fragile pieces on it were unbroken. How they survived is surely a tale unto itself that I wish I knew. I was certain it was out of my price range, but I thought, "at least I can hold one in my hands", and so I asked the vendor to take it down from the shelf so I could get a better look at it.
It really WAS in great shape. A bit of dust, some sloppily applied paint on the face and the white parts of the outfit, and the existing decals were faded; but there were no blobs of glue, and no major breakage beyond a missing umbrella handle, and a missing clipboard. Just for the hell of it, I asked how much. When the answer came back, far lower than I expected, it was an instant sale. And just like that, I had what had been a long standing mystery to me as a part of my collection.

Which brings us to the next portion of this blog entry, and the first one that will have running updates as the restoration of the kit progresses.
The first step would be to break the kit down into sub-assemblies for ease of stripping what paint was there, and for easier repainting and assembly. Much like the Aurora Batman I'd restored some years earlier, my primary concerns were with how brittle the plastic might be, and how much glue I'd need to fight with to separate the parts. Luckily for me, whoever built it had followed the directive in so many instruction sheets and used their Testors glue "sparingly", so that I found it fairly easy to separate the kit from the base, and then break down those components even further. All were scrubbed in warm soapy water and allowed to dry before dunking them in my trusty vat of SuperClean degreaser.

Now, some of you may be very familiar with this stuff. It's like magic, how quickly and easily it strips off decades old enamel paint, while leaving the plastic untouched. I've used it before and it's always worked like a charm. And it DID work on the Penguin. For the flesh colored paint. The WHITE paint.... well, I don't know what they used, but to call it "stubborn" is the understatement of the century. That stuff would...not...dissolve. I left if for 4 days just soaking: nothing. Then I decided to get more pro-active on it, and started scrubbing with a tooth brush. It took HOURS, and some of it STILL wouldn't give up the ghost. Fortunately, a sufficient amount of the stuff did get removed to allow for a new and improved paint job.

As a next step, I thought I'd tackle the re-building of the umbrella handle that was broken off. I studied all the best pics I could find to get a read on the comparative length of that handle relative to other parts of the kit. It was not exact, and I had to cut off a bit more of it after I had thought it done, but I think it looks very good. It's nothing more than some small styrene rod which I heated and bent over an x-acto knife blade handle until I got the right curvature.

I then trimmed both ends to replicate the shape and length of the original piece. A little Aves apoxie sculpt on the curved end to sculpt the rounded shape of the handle's tip, and all that was left was figuring a way to anchor the new piece securely to the old parts of the kit.

I decided to drill out the straight end of the handle and the end of the umbrella the Penguin's holding, then use a straight pin attached to the handle so I could just insert it and glue in place. Took a bit of wrangling, since the pieces are so small, but I got the result I was looking for.

While I was doing this, I was waiting to receive the excellent replacement decal set from JTGraphics, offered through the CultTVMan website. Can't say enough good things about both; the decals are excellent, and CultTVMan's hobbyshop online has always been a great place to find exactly what I need for a project.
At this point, I'm reconstructing the clipboard. Due to the very kindly assistance of one of the members of the Parts Pit on facebook, I have a very large photo (with a ruler for scale) of the missing clipboard, and am using that to build a facsimile. I'm working on the board and it's "papers", first.

The shape of the individual pages of "paper" on the board may not be an exact match, but it will match the shape of the decal.

After that, I need to build the clip. Hoping to get to that soon!
Update 12/18:
Well, it's been some months since I've been able to work on the kit, but I've finally gotten back to it and can show the rest of the restoration process and the completed kit!
As planned, the next step in building the clipboard was the clip itself, and the additional piece of "paper" for the board. Here's the piece as it was originally finished.


Once all the seams and gaps were satisfactorily seen to, the entire figure was primed using duplicolor automotive primer in gray for those parts of the model that would be painted in cooler color tones, and red for those parts that would have warmer colors applied. I find using the red color as a base for all skin tones gives a much better result.


Since the kit is fairly small scale, yet has a lot of nice sculpted detail on the face, I wanted to paint it and use a light wash to bring those details out, rather than use an airbrush for the subtle shading I employ on large scale figure kits. A basic skin tone was applied, then a sepia wash was run over that.


The final touch is to coat the entire eye with gloss lacquer.
It was now time to turn to painting the other elements of the kit, and I decided to take care of the backwards folded umbrella first. The box art showed a greenish umbrella, and I liked that color choice, so I went with it for my version of the kit. After applying the basic green tone, shading was done with chalk pastels in the large folds, and a black green wash in the finer lines. The spines of the umbrella were picked out with silver, and the tag was painted in an off white with a brass eyelet and brown cord. The "SOLD" decal was applied, and the entire piece finished in matte lacquer.


Speaking of the head, it was masked off and the top hat was then painted the same purple tone. The cigarette holder and cigarette being painted earlier in black and off white.


The floor was finished in standard painting techniques, utilizing a dark wash and lighter gray for highlights and weathering. The stacks of money were painted in a light green base color, washed with a black green and highlighted with a sand color that had just a touch of light green added. Each stack had its own decal applied.


Restoring this kit was quite a tricky task at times, but I can't tell you how satisfied I am with the fact that I was able to "save" a 51 year old model kit, and bring it up to its best potential. And not just any old kit, but one as rare and much desired as the Aurora's Penguin. It's a fantastic piece of pop culture, and a truly unique entry in Aurora's lineup of amazing figure models!


And here's one last look at the kit as I originally found it, and how it looks now.

I hope you've enjoyed following along on this restoration project, and keep an eye out for the next entry!
Comments
Post a Comment