Less than a year after Batman made his debut in 1939, he was joined by a sidekick, presumably the first "kid" sidekick in comics: Robin, the Boy Wonder. According to the official accounts of Robin's creation, he was added to give younger comic readers a character with whom they could identify, and one that would bring a somewhat lighter tone to the grim, dark stories that had been the trademark of the Batman's adventures up to that point. While some of the higher ups at DC were dubious of the character's appeal, he turned out to be an immediate success with the readers, and became an integral part of the Batman mythos.
As I mentioned in my blog entry on Aurora's Batman model kit, by 1966 "Batmania" had gripped the country as a result of the extremely popular Batman tv show. Aurora had their Batman kit in production in 1965, and I can easily see that they decided to capitalize on the desire for Batman related merchandise by releasing a kit of the Dark Knight's sidekick, Robin, the Boy Wonder.


When I saw it, I thought it was a brand new release, and quickly bought one for my collection. It was a really nice design; a little tricky to build given the pose. I remember having a bit of a time getting the figure to properly grip the lever on the large upright machine AND balance his foot on the lever sticking out of the small machine on the floor. Regardless, it was a superhero figure kit, and part of the Batman character line up, so I was all in on it. I should mention, that about this time I also saw other suprehero kits from Aurora that I thought were new on the market, as well. Spiderman, Captain America, the Hulk, Superman, Superboy, the Lone Ranger, Tonto... I thought I was in the middle of a figure kit renaissance! I ended up buying most of them and enjoyed building them.
It wasn't until years later, when vintage kit collecting was starting to come into its own that I discovered all those kits I'd seen in 1974 were re-releases of the originals from the mid 1960's. They had all been repackaged with new box artwork that reflected the "modern" era of the heroes in the 70's, and were grouped under the "Comic Scenes" label. That meant that each kit had a comic book featuring the character in a short story as part of the instruction booklet, and even included one page that could be used as a backdrop for the kit itself. It was an interesting idea and I did use some of those pages for some of the kits I owned.
Of course, learning the kits I had in the 70's were re-releases carried with it the desire to learn more about the original releases of the kits, something I would spend years digging into. The first time I saw the original Robin kit, I knew I wanted one. I loved the artwork on the box, depicting Robin as he appeared in the early days of the character, with the trademark "double cowlick" in his hair, when he was most definitely the wise cracking, brash kid sidekick. Even the instruction sheet illustration shows "attitude" in his facial expression.

It was through seeing some of the instruction sheet illustrations and actual photos of the finished original kit that I learned, as I mentioned earlier, that the box art wasn't the only thing Aurora had changed for the re-release. For the 1974 version, they had created an entirely new headsculpt reflecting an older, teen character. Robin's hair was parted to one side, the domino mask he wears was different than the earlier version, and the "R" emblem on his chest which was originally a sculpted detail element, was removed. The '74 kit instead included a sticker sheet (not even water slide decals as in the '66 kit), and Robin's "R" emblem was a part of that sheet. One final change was the removal of the Robin, the Boy Wonder name plate. None of these changes was really a true detriment to the kit; in fact, the headsculpt was a marked improvement, as the original piece had a circular mold artifact right in the middle of Robin's forehead, which I've seen a number of modelers complain about getting rid of. But I think it was the fact of having an original Batman kit in my collection that pushed me to want the original Robin, as well, and I was determined to acquire one. Well, at least I was until I saw the prices those kits were going for. The numbers were incredibly high, and for many years I tried to reconcile myself to the fact that the kit was simply out of reach. That is, until 1999...
Enter Revell model company, which had bought many of the original Aurora molds, and from time to time was releasing a kit from the Aurora lineup. I couldn't believe my eyes when I saw this:

It was Robin, the BOY Wonder! Sure, the box art had changed yet again, but the character had the trademark early hair style, the older domino mask, and the text on the box stated loud and clear: "This re-released model kit contains all the plastic model parts as they originally appeared in 1966"!! It was another "grail" moment in model kit collecting! I bought the kit immediately, took it home, opened the box and began to inspect it. Had I really gotten my hands on the ORIGINAL kit? The first thing that caught my eye in the box was the name plate; it had been restored!! I looked for the chest piece and the head sculpt, found them, and... they were the parts from the 1974 release. Side part hair, different mask, no molded "R" emblem. To say I was disappointed was an understatement. I felt betrayed, duped... Revell had LIED to me! Well, I had the kit, at least, which had not been available in any form for years, so I put it with my unbuilt kits, figuring on getting to it later in the year, and doing what justice I could with it using the skills I had built up since my childhood model building days. I still wasn't happy about the kit being the later edition, but I resolved to make the most of having it.
As it happened, a couple years went by before I even thought about the kit again, and then it was only because on one of the websites I'd found that offered after market parts for existing kits, I'd found a seller offering resin recasts of the ORIGINAL head sculpt and chest part for Robin. They were very well done, and the seller had even managed to cast one of the older Robin head sculpts that didn't have much of a mold artifact in the forehead. So there it was, my path to building up an original Robin kit had become clear. Sure, it was a mash up of non "vintage" parts, but after being built and painted, no one would know the difference.
It wasn't until after I had the vintage repro parts in hand, that I took a serious, and somewhat sobering look at the kit and its base. Looking at it through the eyes of a model builder who had been doing customizing work, I realized the kit was really rather bland in its detailing. Sure, the pose was dynamic, and the figure itself was nicely detailed, but the base? Honestly, it looked like little effort was really put in to make the machinery convincing. There were a number of large dials on the main upright machine, and a few on the smaller machines, some odd triangular shapes that could be buttons or something, some round shapes that were meant to be lights, a thermometer, and a weird rectangular shape that could be some kind of hatch? What's more, the decals (and stickers in the '74 release) were very simplistic dials and gauges; just blocks of color and an arrow for the dial itself. It was, sadly, definitely "kid stuff", and not the kind of thing you'd see in a more modern, "serious" super hero kit. Take a look at the pics of the finished kit in the original instructions:


And the original decal sheet:

Still, that's not to say the potential for something really cool and interesting wasn't there; it would just require a LOT of extra detailing. Actual lights, different gauge and dial faces, extra surface textures... I began to work up a plan for how to get it done, and what I wanted the kit to look like as a finished product.
Sometimes, the planning stage for a kit can stretch out a lot longer than I anticipate. A LOT longer. Like a decade. In fact, TWO decades... That's what happened here, and actually, it was a great boon to getting this kit done the way I wanted. In all the time that passed, advancements in electronics and led lighting meant there were extremely small leds that were made to fit into very cramped spaces, and that would be exactly what I needed here. In early 2020, I began to look around for the lights I would need for the kit, and found a fantastic supplier offering a variety of leds with numerous pre-programmed effects.
Looking at the kit, my plan was laid out like this: the large upright machine would have a row of three leds at the top with a "breathing" effect, which is a slow pulse. The vertical row of lights on the same unit would be a mix of flashing and stationary lights of different colors.
The larger of the two machines on the floor would have one row of flashing leds in different colors, and the smaller machine would be set up with a row of very small flickering leds; also, I would open up one end of the small machine where there was a molded grate, and install an actual metal grate that would allow some of the led lighting to bleed out through the mesh. Since all the leds I would be using had preprogrammed effects, there was no need to deal with circuit boards to control the various flashes and pulses; my only concern was the power requirements. Fortunately, the manufacturer of all the leds was very forthcoming with suggestions on how to set up power supplies, and the information was extremely helpful. I decided to set up three batteries; one for the flashing lights, one for the breathing lights, and one for the stationary/flicker lights. Each would have its own micro switch, and all the wiring could be stowed underneath the base and behind the tall upright, while the batteries themselves could be stowed in the low "step" unit at the base of the upright machine.
Beyond adding lighting and new gauges and dials, I felt the overall aesthetics of the machines needed to be addressed. I wanted them to look very retro, with a distinct late 1950's look, and I borrowed some of the color and detailing from the designs used for the various computers that actually existed at that time, as well as the fictional computers used in the "Fallout" series of games.
I began by opening up all the holes I'd need for the various lights. Here you can see I've dremeled out the spaces in the small and medium sized machines, and have removed the small molded in rectangular grate in the face of the small unit. I've also started rounding out the hard edges on the corners of the machines. This not only gives them a less toy like look, but also a more retro appearance.


The three circular shapes on the two panels were solid, and meant to be decorated with a sticker or decal. I used a flat circular bit to rout out a section of the center of each, creating a rim for each dial. This would allow me to later place a new decal and cover that with a small circle of clear plastic to better replicate an actual gauge or dial. The triangular shapes I had decided to use as base plates for small toggle switches that I would make out of plastic rod. The small holes in the hexagonal shapes are meant to house small leds. I encountered my first challenge here, when I realized the thickness of the plastic would not allow the leds to sit in the face plate and look like light bulbs. This issue was solved using a fiber optic strand for each individual led.
This is the upright machine with the lighting holes drilled.


The large hole had formerly held a low domed shape meant to be an oscilloscope. There was no decal for this, and modelers had usually resorted to painting the effect by hand. I decided to light the area and utilize a clear low dome with a decal backing it. The small rectangular depression below the oscilloscope was meant for a decal/sticker, but I found a small piece of laser cut metal from a tank detail set that fit perfectly, so I thought I'd create an annunciator for the scope and build a small switch with an accompanying decal.
Speaking of decals, some years before I began the build, I had also picked up a very nice set of decals for use with the kit. They were far more detailed than the originals, and had a number of nice warning labels that I intended to use.
Here's the upright machine with a coating of primer, and a reel to reel magnetic tape unit I had begun to build. This was going to be installed in the large rectangular depression on the lower part of the upright machine. This was originally a space for a large decal meant to look like a needle recording readings on paper, but I never liked that design, and the magnetic tape reels would definitely give the whole piece a more high tech appearance, and put it firmly in the retro aesthetic used in the "Fallout" games. You can see I've also installed the backing and led holder for the oscilloscope, and cut out the portion of the upright connected to the low step. This will allow the wiring connections from the smaller machines on the floor to hook up to the batteries.

This is the fully assembled medium sized machine unit on the floor, without lights installed. You can see that the corners have all been rounded off, and a piece of sheet plastic has been added to one side that previously had no detailing at all. Steel pins were used to create the small rivets in each corner of the sheet. The brass rod protruding from one end of the unit is a connection point for a length of coiled cable that will connect the medium and small floor machines. I wanted the machinery to have a more cohesive feel, so that the big red lever Robin was trying to push would do more than deactivate one small machine. Just seemed to make more sense to me that way.


You can see the smaller unit here, again with all edges rounded for aesthetic purposes. A piece of sheet plastic has been added to the non-detailed side of the unit, as well, and the metal grate has been installed and masked off in preparation for painting. A short section of plastic rod has been used as a cable connector.


Here I'm test fitting the cable to each unit. The cable itself is a section of woven cord, sold as detailing for Japanese mecha kits. I've also uses short sections of brass tube and another small detail piece of turned metal for the "plug".


The next pics show the upright machine with some sections of sheet plastic added to give the appearance of large "plug-in" units that can be swapped out. Like the other smaller machines, the upright has had all edges rounded out, and the sheet plastic pieces have been similarly detailed. Again, steel pins were used to create the rivets. You can also see the completed switch I built for the annunciator. This was made from a cut section of plastic rod, sliced in half, and notched. Thin sheet plastic was then cut into the tab shape I wanted and inserted into the notch. The completed switch was then glued to the rectangular depression.


This is the reel to reel magnetic tape unit, again. The reels are made from inner wheel pieces from a car model kit, and I've cut sheet plastic for the side of the reel that will be facing out. Plastic tube was used to create the spool holders.

Work continues on the detailing of the small and medium machines; here the toggle switches have been added. The base of each switch is a small ball of apoxie sculpt inserted into the drilled hole, and the switch stem is small plastic rod anchored into the still uncured putty.


The large upright machine is seen here, with the small 3D printed handles added to each one of the "plug-in" sections. Also, the magnetic tape unit is nearly complete, having had more detailing done on the spool holders, as well as the addition of tape tension rollers and the tape reader assembly added.


And here are all the units in place along with the low step piece to test for proper fit as well as getting a feel of how they look together.


If you look closely at the floor section in the last pics, you might notice a pattern of lines in the surface to indicate floor tiles. I scribed those lines in after noting that the floor looked too bland. A grid was drawn in pencil and I used a scribing tool and metal ruler to create the lines. Here is the floor with final grimy paintwork applied.

And here again with the medium and small machines in place. Each of them has its final color applied. I had originally wanted to paint the machinery in black, but decided a dark grey would allow for more detail to be seen.

Alright, this is a bit of a jump forward. This pic shows the small machine unit with its final paint work done, and all labels applied. The "on/off" label and "480 Volts" are from the aftermarket decal set I mentioned earlier, while the oscilloscope is a decal I created myself using a photograph of an actual oscilloscope screen. The color scheme of the buttons and switches is based on actual oscilloscopes from the 1950s.

Another pic of the small machine, this time with all remaining surface detail elements applied. This includes the small connecting wire on top, the oversized red lever and three small laser cut metal discs from a Japanese mecha kit that happened to fit exactly into the circular shapes on the side of the machine. It's difficult to see in this pic, but the fiber optics have also been installed in each of the small holes above the toggle switches.

Here's the medium sized machine with its final paintwork complete. You can also get a clear view of the three gauges. Each of these uses a decal I made from a photo of an actual vintage electrical gauge, covered with a small circle of clear plastic. All leds have been installed, and again, the color scheme is based on photos of actual electronic equipment from the 1950s. I've also painted up the chemical spills, and have gone with the purple and green coloring to suggest the presence of the clown prince of crime, the Joker!

Here, both the small and medium machines have been secured to the base, and you can see the wiring from the lights each unit contains. I should add here that a separate piece of thick sheet plastic matching the dimensions of the floor will be attached magnetically to the existing base to keep the wiring in place, and to provide additional space for the amount of wiring that has to snake up into the upright machine.


The completed magnetic tape unit with final paint scheme applied. This was based again on photos of actual pieces from the 1950s. The tape itself is made from ultra thin sheet plastic that has been glued to each reel and partially wound around it. The reels were then placed on the unit and glued into a position that would maintain sufficient tension in the sheet plastic so it would give the proper look of magnetic tape stretched across tension rollers.

Okay, there's a lot going on in the next pic. The upright machine has had final paintwork applied, and more surface detailing modifications. Specifically, the two white rectangular bars near the top of the piece have had a series of holes drilled into them to accommodate a set of control knobs for each gauge associated with them. The gauges themselves have been added, again using decals I made from photos, and sealed with a clear plastic disc cut to size. The thermometer, which had been molded detail, has been removed and a groove scribed in so that a piece of clear plastic rod can be attached to give the appearance of a glass thermometer tube. The vertical row of leds has been installed as well as the three breathing lights near the top of the unit. The oscilloscope has been completed using a decal from the aftermarket set and a clear half dome. Other decals from the aftermarket set have also been applied.

And here is the upright machine again with the almost the last of the surface detailing in place. The two rows of control knobs, the clear thermometer tube, and the reel to reel magnetic tape unit. The low step has also been attached. Still to be put in place is a large section of clear sheet plastic that has been cut to fit over the large needle gauge in the middle of the machine.

And finally, the first light test!

Here's a short video of the initial light test.
After determining that all the lighting was functional, the various machine pieces were attached to the base.

And lights were tested again... all systems GO!


Another video of the light test after all machines are in place.
With all the wiring for this kit, I needed to find a way to keep things neat and in place behind the upright machine. I decided to build a backing for the piece out of thick sheet plastic, and used to plastic "I" beams on either side of the machine as a framework to hold the backing. Here you can see the wiring, and the back piece.


At this point, the base and all its modifications were basically done, a process that took at least 3 months of planning and work. I was a bit burnt out on taking wip photos by this time, so unfortunately, I only have one pic of the actual star of this model, Robin.

When this pic was taken, all of the major seams had gone through the first round of sanding and filling, and the initial coat of primer had been added. As you can see, I've just gone through another round of sanding work on the seams. The figure was NOT a standard build, as I discovered when I tried fitting the repro vintage head sculpt and front chest piece to the parts of the kit I bought. It was only then that I realized the head sculpt from '74 actually had a different diameter neck, and the collar that was molded into the chest piece had been enlarged in diameter as well. The result? The front and back half of the chest didn't match. The neck could be fixed by adding apoxie sculpt to increase the diameter at the base so it would better fit the collar, but that left me with the dilemma of not having the sculpted detail of the "R" emblem. I had waited too long to build the kit with that detail, so I figured out a way to add the sculpted "R" to the torso half from the kit. I carefully measured the placement of the emblem on the aftermarket piece and marked its placement on the new plastic torso half. I then cut the emblem from the aftermarket piece, cut a corresponding hole of the proper size in the kit piece, and installed the emblem like a plug. After a very small amount of putty and sanding work, it was a perfect blend, and indistinguishable from the original with the sculpted detail. The headsculpt neck was altered with putty for proper fit into the collar area. The final bit of detailing was the addition of six small plastic rod pieces on Robin's utility belt. I always felt there needed to be some kind of containers or capsules on his belt to give it the same look of functionality as Batman's utility belt. My inspiration came from the Batman tv show, in which the same kind of objects had been added to Robin's belt. I think it's a perfect, and quite logical bit of detail.

All that was left was paint and assembly of the figure. Like my Batman kit, I wanted to go with what I considered a more "realistic" color scheme that still utilized the classic red, yellow and green of his costume, but with each color being somewhat muted. Here's a closeup look at the final paint scheme on the figure.


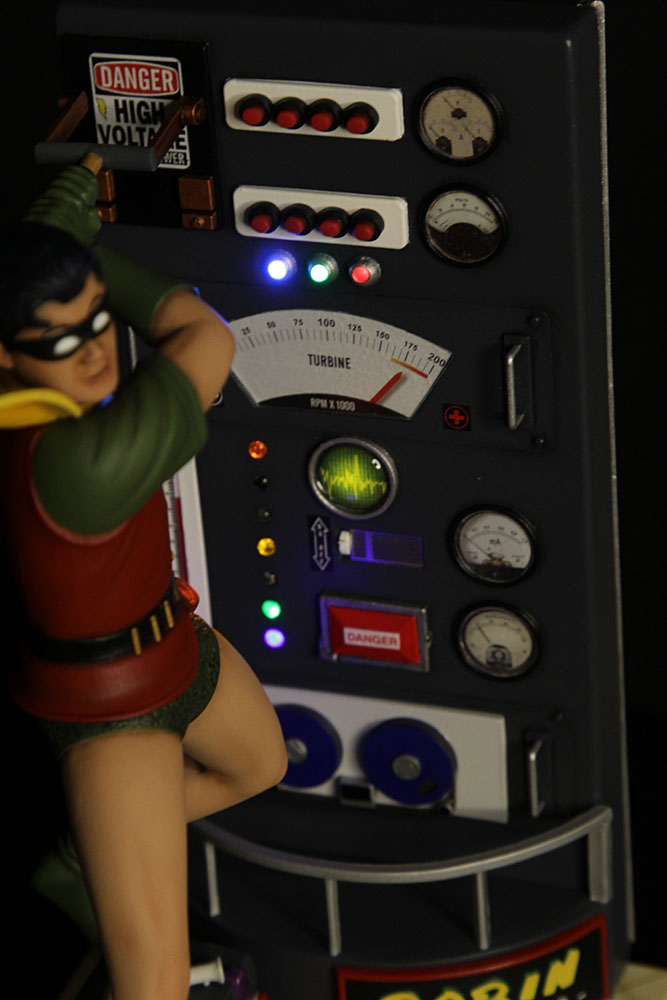
And finally, the fully assembled kit! The first set of pics is in low light to better show off the light effects.


And with a little brighter lighting:


And that, as they say, was THAT! I finally had not only the original version of the kit I had wanted but one that I felt was brought up to its highest potential. It's now one of my my favorite kits in my entire collection, and one of which I'm most proud of the work I put into it. Thanks for sticking around to the end of this blog entry; I hope the results have been as satisfying to you as they have been to me. Here's one last video of the finished kit:
Til next time: keep building!
Comments
Post a Comment