I had never heard of this kit back when I was a kid building monster models. It wasn't until my brother gave me a vintage Revell kit of The Phantom, that I learned (through an ad on the side of the box) of THIS one. While the Phantom was cool, THIS was something special, in my book. Even moreso after I finally saw a small picture of the actual kit, but finding one of these was like the proverbial needle in a haystack. Until last year, when Atlantis produced a fantastic re-issue of it. Even better, there was now an aftermarket base by Thunderboy that accurately reproduced the base as shown in the box art (a vast improvement over the small parts that were originally included).
I would've built this kit soon after buying it anyway, but as it happened, there was a group build of it that started up on the HobbyTalk forum (
http://www.hobbytalk.com/bbs1/), and it was a good kick in the butt to get me started in on it.
Here are the initial sub-assemblies:
One thing I decided after looking the kit over was to add just a little bit of extra detail to bump it up a notch. I mean, this is (in my opinion) a truly classic "spaceman" design, and it deserved a little extra glitzing up to bring it up to its full potential. One of the details that demanded to be re-done was the dual air hose detail molded into the torso. My goal was to closely replicate the look on the box art and put actual "hose" on the figure. That meant a little alteration of the air tanks, too, to make the connections look right. Here's the torso with the hose detail sanded smooth:
And the tanks with the new holes drilled out:
And you can see that I've used a couple of small rivets to act as "connector plugs" for the hoses.
One of the things that didn't need re-working was the head sculpt. Now, this kit is about 1/8 scale, so the head is fairly small, but man, the detail is really quite remarkable, down to sculpted teeth in the figure's slightly open mouth, and scribed in irises in the eyes to indicate position. That was a detail I had missed until priming.
When painting flesh, and a head in particular, I incorporate multiple layers of color and matte lacquer sealant to get what I feel are very satisfactory results. I also use a number of tones of pastel chalk that are ground up and brushed on to the figure to warm up the skin and give it some variety. Maybe I'll go over it in detail in a future post. In any case, here's the head of the kit with finished skin and eyes. I was pretty pleased at how this turned out.
At this point, I turned my attention to the base. My intention was to get it looking like the actual Martian landscape, and do something a bit flashy with the sculpted in logo; something that would reference a logo on a movie poster. The idea was to get a fade from red, through orange and to yellow in the lettering. Here's the first pass with the yellow base color:
Next came the orange:
I don't have any pics of the red, unfortunately. At some point, it just became about going back and forth with all three colors the get the right "spread" of each and a satisfactory progression from dark red to light yellow. The background was then painted black with a brush. It was a bit... painstaking. :)
I still had to paint the actual ground of the piece. Yeah, that orange and yellow mess on it in this pic is NOT the final look. I needed to let everything on the base dry for a bit, so turned my attention back to Flash. Here's a pic of some of the body parts painted up. I wanted to go for a very clean look like on the box art, so decided to do minimal shading, but still add a gray tone for the joints of the suit to provide a little visual interest.
While those were drying, I did some paint work on the oxygen tanks, again going for a very clean, pristine look. This is a classic pulp hero, after all, and he always looks good, you know?
I added the two large round discs on the tank to cover the low relief discs that were in the plastic already. Again, I thought it added a little visual interest. Here's the underside of the tank with the hose connections:
The paintwork here involved laying down the base coat of yellow, masking it off, and then applying the silver. There was a LOT of work on the seams of the tanks. The two halves didn't seem(no pun intended) to want to join together as neatly as they should. In the end, though, I got the seamless look I was going for, I think.
One of the other parts of the kit that needed a little extra detailing was Flash's blaster pistol. It's got a very cool, classic "ray gun" look, but could stand a little extra bit of polishing. The "business end" of the gun in particular looked poorly molded, and didn't have a hole in the barrel. My solution was to file down what bit of existing detail there was, and replace it with one of the same rivets used in the air tanks, but inverted. It gave me just the look i wanted. For the back of the gun, I felt it could use some kind of sighting guide, so I dug through my micro parts stash, and found a small metal piece that fit against the round body of the gun, and had a small rectangular section jutting up. You can't see it well in this pic, but it shows in one of the finished pics:

And here's a pic of the painted torso, pre-shading, that shows off the straps to the oxygen tanks. I painted them blue instead of red on the box art, simply as a matter of personal aesthetics. And it also reminded me of some of my old Major Matt Mason space toys. Call me sentimental, but I think it works better than the red.
The next pics are a BIG jump in the process; I'm afraid I didn't take a lot of pics during the assembly and shading of the body. In any case, here you can see how the figure looks assembled, and can get a look at the finished head sculpt with the hair painted.
And here you can get a good look at the hoses I used. They're actually solid flexible strands that I've had laying around in the parts bin for YEARS. It's often like that: you'll have something for the longest time before you actually have a use for it, but man, is it great you decided to keep it! Take a look:
I honestly don't know how I could have sourced anything better. It's the exact look I wanted.
Here you can see how the hoses slot into the connectors on the tanks:
At this point, I stopped taking wip pics, and just forged ahead and completed the kit. A couple other things I did were to use a strip of Bare Metal foil around the "collar" of the bubble helmet. Nothing like real metal to make a piece look like real metal. I also added a bit of actual sand to the base before I painted it.
The base came with an additional half Martian, and both it and the stock Martian from the kit were painted the same way. I wanted to use the box art as a guide, but thought I'd tone down the colors to get a more "realistic" look. The tentacles, I wanted to look almost exactly like the box, with the addition of being distinctly slimey, so they got a gloss coat of lacquer after being painted up a truly nasty looking green.
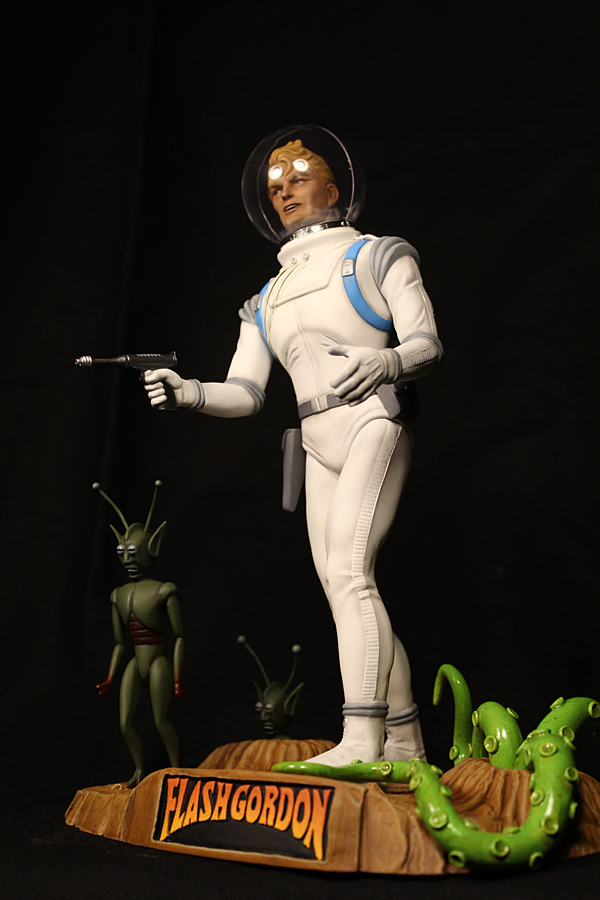
The final result is this:
And here you can see more detail in the gun:
The Martian was fun to paint. I airbrushed the red detailing onto its hands, working in a nice fade as on the box art:
The finished base, showing the logo and slimey tentacles:
And a few more views of the whole kit from the other side:
The next few pics were taken with various lighting set ups using colored led lighting. I wanted to get something good and "space-y". :)
These next two are my favorites, particularly the last shot. The blue lighting just gave the kind of "deep space, other-worldly planet" mood I wanted.
I just think there's something really dramatic in the look of this one, even though you can't see the base.
And that's it! Thanks for following along in this first post. I'll have another kit up soon! :)


Comments
Post a Comment