In 1966, Aurora produced the last of its large scale monster model kits. It was number 13 in the line (a fitting number, indeed!), and was a departure from what they had established in the line so far. James Warren, publisher of Famous Monsters magazine, had approached Aurora with the idea of producing a kit that would be connected with the magazine, and would feature the magazine's logo on the box cover. In exchange, Warren would heavily advertise the kit in his monster magazines. The idea was a classic: a forgotten skeletal prisoner, languishing away in a moldering dungeon setting.

The difference from the previous kits was its lack of a connection to any established monster film franchise,which made it unique among the kits (although it could be argued that the Salem Witch had no direct connection, either, to any film). Another stand out feature of the kit was the inclusion of a wall "set piece" to create a mini diorama, something the other kits lacked, as well. I've read that the feasibility of including such a piece came down to the economics of producing the kit; a skeleton uses far less plastic in production, leaving more room for additional parts.
The kit was a great success for Aurora, and was a fitting farewell to the large scale monster kits they had introduced earlier in the decade. It really is a beautiful kit; the details are wonderfully sculpted, and the whole concept is a perfect fit for a monster kit line up.
In the 1970's, when Aurora re-released the monster kits with the new "Frightening Lightning" glow in the dark parts, my brother was the proud recipient of this particular monster kit for one of his birthdays. I remember looking at all the parts, and thinking how cool the whole thing was... also wishing that I was the one who got to build it! My brother did a great job on the kit, though, and it held a place of honor with our other monsters kits for years to come. Knowing what I know NOW about building the kit, my hat is definitely off to my brother for his skill in bringing the whole kit together, since I came up against a significant challenge in the final assembly in trying to get the skeleton to properly fit onto the base and stay connected to the two manacles (foot and neck) that attach him to the wall. But more about that later...
I bought my copy of the kit in 1992, and apparently it was produced by Cinemodels, although the kit didn't have ANY logo other than Aurora on the box art. The only difference from the original box is the addition of a small bit of text on the side saying the Aurora logo is used by permission from Tomy America. That's it. It's a more or less exact copy of the original box, which I love. The base of the kit even has the molded in "Aurora" logo and "1966" molded in the plastic. I'm told Monogram actually produced it using the original molds and really did a great job keeping the feel of the original as intact as possible. From what I can tell, it was a fairly limited run of kits. I was lucky to grab one when I could.
 The kit itself was very well shot; nice clean parts all the way around, with great detail. Opening that box was like walking back in time... Also, this was among the first (if not THE first) of the monster kit re-releases that used the old Aurora long box and cover art format. Up to that point Revell/Monogram had re -issued some of the kits in various sized boxes with different color art (even the ghastly "Luminators" series), but not here: it was straight up retro. Here's a look at the parts and instruction sheet, which was also an EXACT reproduction of the original (no additions or alterations, whatsoever):

And a closer look at the parts, themselves:
 As you can see, when I took this photo, I had already started some of the sub-assemblies (manacles, torso and hip/legs, skulls and arms/hands). One of the few things I did in the way of "customizing" this kit was to cut into the detailing along the edges of the clothes to make it appear more ragged, as the sculpted detail suggests:
 And a closer look:
 So basically, at every point where a groove was sculpted into the clothing, I cut into and separated the plastic just a bit. It was my intention to show you more of this detail up close, BUT after this last pic was taken, I moved across the country, and it took awhile to get set up in a new work space, and by that time, I just wanted to BUILD and get something done. So... most of the remaining pics are of the completed kit. I do have one more pic showing the kit after it's been primed for painting. You may note I use two different tones: one warm and one cool. I like to always start with a primer undercoat that is in line with the warmth or coolness of the color I'll be placing over it. It's a subtle effect, but I think it ultimately makes for better color when painting is complete.

Now, about getting the skeleton to stand in the right spot so it's connected at the ankle and neck to the wall: it was a nightmare. And looking at the various builds out there, I can see multiple solutions were attempted to get around what is an obvious design flaw on Aurora's part. I had assembled the figure completely, thinking it would be an easy fit... oh no. I ended up having to break apart the lower legs and reposition them, along with removing and repositioning both feet. Actually, to get the stance right, I attached the skeleton to the wall by its neck after the legs had been removed, then fit the legs one at a time back onto the hanging body. Took me about 4 hours of fidgeting with it to get it "right".


In spite of all that, I'm very happy with how it turned out, overall. The edges on the clothing being more ragged are a nice, if subtle touch. In terms of painting, it was fairly straightforward, although I did utilize chalk pastels to create brownish highlights on the jacket to try and get the look of old, worn, black fabric. This was augmented with some dry brushing using a dark brown tone.

I had great success in utilizing some pre-mixed "shade" tones from Citadel. They really went a long way to making the bones look old and dirty.


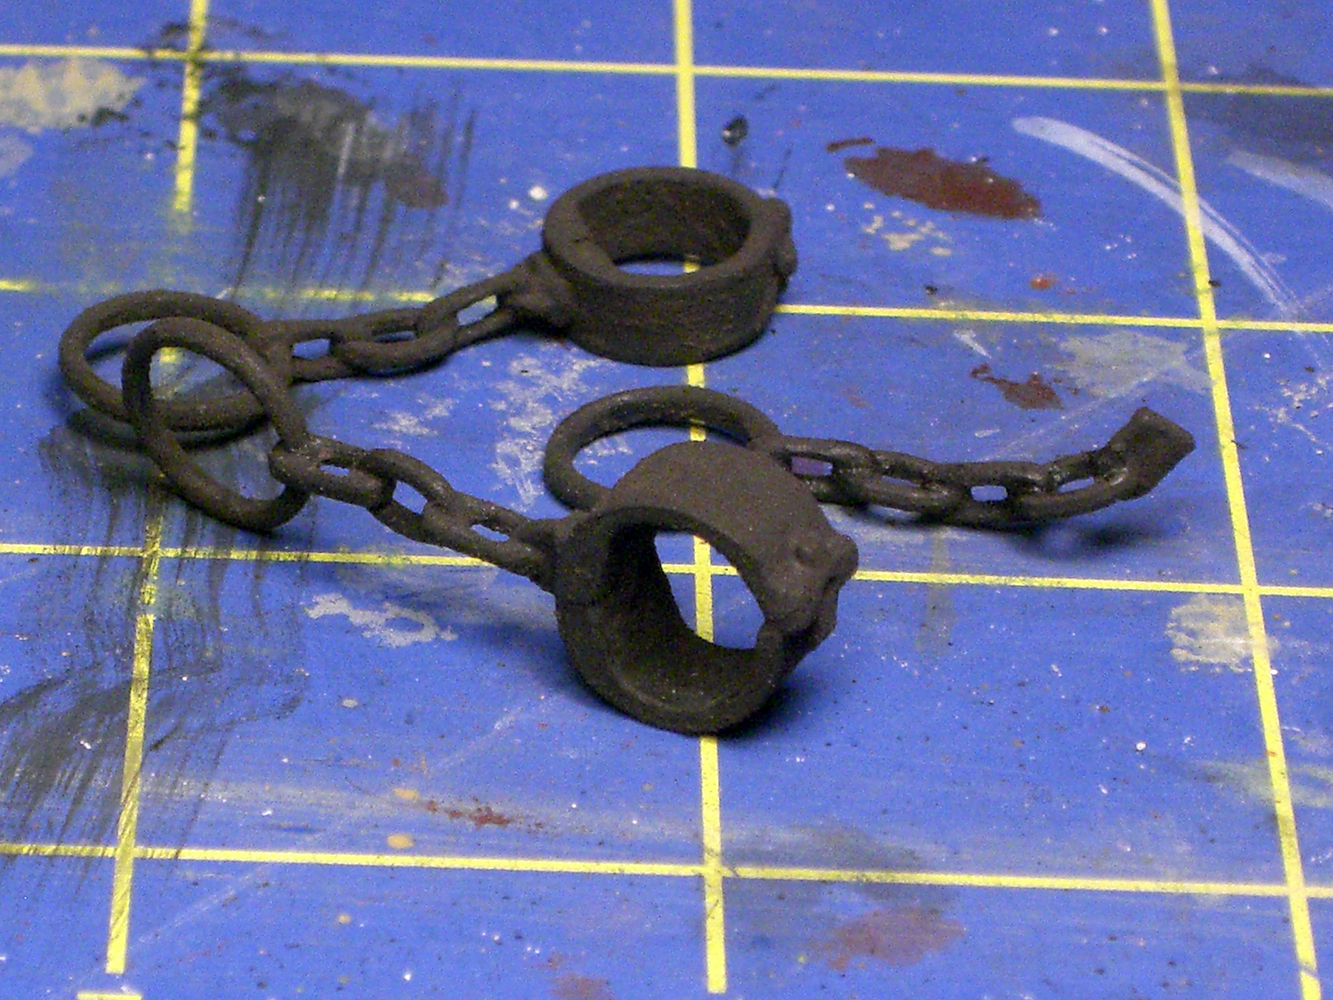
Citadel also has an amazing glaze specifically meant to simulate metal corrosion. It's simple to use and terrific looking when dry. I simply brushed it on over the steel paint I used on the chains and manacles. It not only colors but adds some textural elements to roughen up the surface of what's being painted. Oh, I should say here that I did do some extra detailing on the chains, also. For some reason, the chains alternate between open links and solid ovals. I don't know if this was a molding issue or what, but I never liked the way it looked, so I carved out the solid oval shapes to look like chain links. It was a bit tedious, but looks so much better, I think.


Some of the other parts that benefited from the Citadel shade additives were the wildlife pieces: the rats and snake in particular. Speaking of the wildlife, I was always curious if the animals pictured could actually be present in the scene. In this case, it's two rats, a large tarantula-like spider, and a snake of some sort. Well, figuring that "Castel Mare" was somewhere in France, I did a little digging, and lo and behold: all the animal choices are feasible. The rats are the Norway rat:


The spider is the Mediterranean Funnel Web Spider (which is actually a BIG spider):


And the snake is the Iberian Viper:


I don't know if that accuracy holds true for all of the monster kits (some of 'em just want to have scary animals in there, I'm sure), but for this one, it was nice to have some actual creatures to work from to make the whole thing more realistic.
Finally, here are a few pics done using some colored light effects in an attempt to mimic the box art painting.


All in all, it's a fantastic kit, gloomy and atmospheric... I'm glad the powers that be at Aurora gave the idea from Warren the green light so we could have this creepy skeleton hanging around our classic monsters.


'Til next time: keep building!

The difference from the previous kits was its lack of a connection to any established monster film franchise,which made it unique among the kits (although it could be argued that the Salem Witch had no direct connection, either, to any film). Another stand out feature of the kit was the inclusion of a wall "set piece" to create a mini diorama, something the other kits lacked, as well. I've read that the feasibility of including such a piece came down to the economics of producing the kit; a skeleton uses far less plastic in production, leaving more room for additional parts.
The kit was a great success for Aurora, and was a fitting farewell to the large scale monster kits they had introduced earlier in the decade. It really is a beautiful kit; the details are wonderfully sculpted, and the whole concept is a perfect fit for a monster kit line up.
In the 1970's, when Aurora re-released the monster kits with the new "Frightening Lightning" glow in the dark parts, my brother was the proud recipient of this particular monster kit for one of his birthdays. I remember looking at all the parts, and thinking how cool the whole thing was... also wishing that I was the one who got to build it! My brother did a great job on the kit, though, and it held a place of honor with our other monsters kits for years to come. Knowing what I know NOW about building the kit, my hat is definitely off to my brother for his skill in bringing the whole kit together, since I came up against a significant challenge in the final assembly in trying to get the skeleton to properly fit onto the base and stay connected to the two manacles (foot and neck) that attach him to the wall. But more about that later...
I bought my copy of the kit in 1992, and apparently it was produced by Cinemodels, although the kit didn't have ANY logo other than Aurora on the box art. The only difference from the original box is the addition of a small bit of text on the side saying the Aurora logo is used by permission from Tomy America. That's it. It's a more or less exact copy of the original box, which I love. The base of the kit even has the molded in "Aurora" logo and "1966" molded in the plastic. I'm told Monogram actually produced it using the original molds and really did a great job keeping the feel of the original as intact as possible. From what I can tell, it was a fairly limited run of kits. I was lucky to grab one when I could.


And a closer look at the parts, themselves:


Now, about getting the skeleton to stand in the right spot so it's connected at the ankle and neck to the wall: it was a nightmare. And looking at the various builds out there, I can see multiple solutions were attempted to get around what is an obvious design flaw on Aurora's part. I had assembled the figure completely, thinking it would be an easy fit... oh no. I ended up having to break apart the lower legs and reposition them, along with removing and repositioning both feet. Actually, to get the stance right, I attached the skeleton to the wall by its neck after the legs had been removed, then fit the legs one at a time back onto the hanging body. Took me about 4 hours of fidgeting with it to get it "right".


In spite of all that, I'm very happy with how it turned out, overall. The edges on the clothing being more ragged are a nice, if subtle touch. In terms of painting, it was fairly straightforward, although I did utilize chalk pastels to create brownish highlights on the jacket to try and get the look of old, worn, black fabric. This was augmented with some dry brushing using a dark brown tone.

I had great success in utilizing some pre-mixed "shade" tones from Citadel. They really went a long way to making the bones look old and dirty.


Citadel also has an amazing glaze specifically meant to simulate metal corrosion. It's simple to use and terrific looking when dry. I simply brushed it on over the steel paint I used on the chains and manacles. It not only colors but adds some textural elements to roughen up the surface of what's being painted. Oh, I should say here that I did do some extra detailing on the chains, also. For some reason, the chains alternate between open links and solid ovals. I don't know if this was a molding issue or what, but I never liked the way it looked, so I carved out the solid oval shapes to look like chain links. It was a bit tedious, but looks so much better, I think.


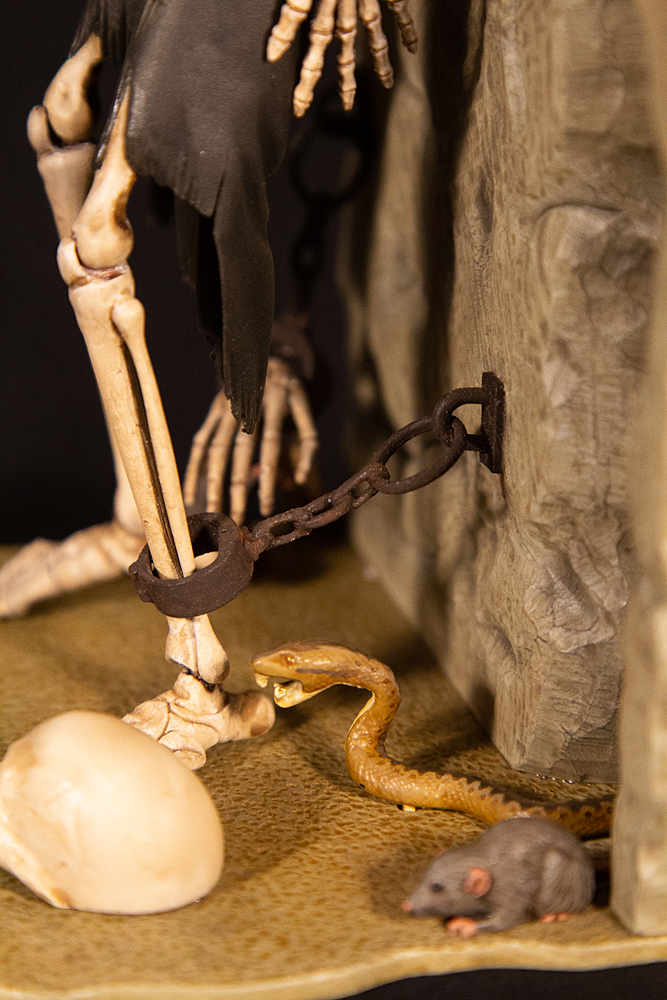
Some of the other parts that benefited from the Citadel shade additives were the wildlife pieces: the rats and snake in particular. Speaking of the wildlife, I was always curious if the animals pictured could actually be present in the scene. In this case, it's two rats, a large tarantula-like spider, and a snake of some sort. Well, figuring that "Castel Mare" was somewhere in France, I did a little digging, and lo and behold: all the animal choices are feasible. The rats are the Norway rat:


The spider is the Mediterranean Funnel Web Spider (which is actually a BIG spider):


And the snake is the Iberian Viper:


I don't know if that accuracy holds true for all of the monster kits (some of 'em just want to have scary animals in there, I'm sure), but for this one, it was nice to have some actual creatures to work from to make the whole thing more realistic.
Finally, here are a few pics done using some colored light effects in an attempt to mimic the box art painting.


All in all, it's a fantastic kit, gloomy and atmospheric... I'm glad the powers that be at Aurora gave the idea from Warren the green light so we could have this creepy skeleton hanging around our classic monsters.


'Til next time: keep building!
Comments
Post a Comment